To append a staff choose:
→
or simply press Ctrl + A. The staff is always appended at last position.
To change the staff properties right click staff not too close to a measure line. The staff config menu appears:
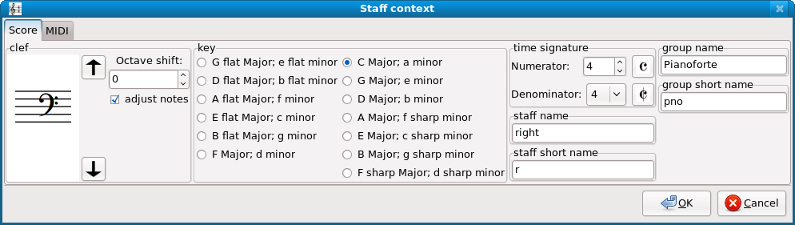
Choose staff name, clef, time signature (likewise  or
or
 ), and key signature on appropriate panel and press OK! The
 adjust notes determins whether or not NtEd shall adjust the appropriate notes such that their pitch is kept. This concerns the clef and key signature change. The octave shift entry
determins an optional octave shift of the clef.
Note! LilyPond has its own rules for choosing
symbols or
. So, do
not expect the same symbols in LilyPond!
The staff short name is printed at 2nd, 3rd, ... page.
The group name and short group name have the same meaning as staff name
and staff short name for groups of staves. (see System Layout)
The neutral clef has 3 forms:
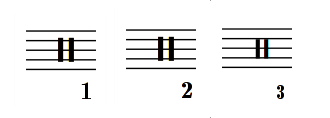
The difference is the MIDI mapping. The first form - signed with "1" - maps the note lines to pitches like the treble clef would map. The 2nd form - signed with "2" - maps note lines to pitches like the bass clef would map. The difference is not visible.
Note: If you choose neutral clef 1 or neutral clef 2 the notation conflicts with usual drum notation and it is not exported to LilyPond. An alternative is to use the drum system.
On MIDI tab you can change the midi parameters which influences the sound during replay:
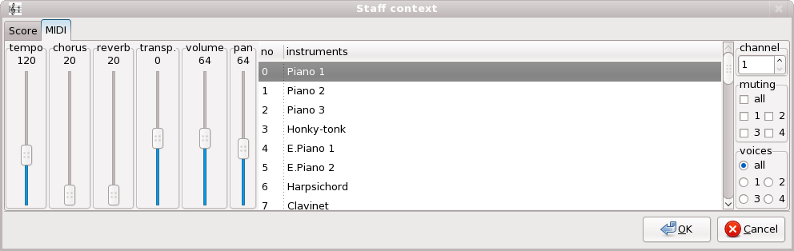
The instrument panel lets you select the timbre. It assumes a general midi table. Furthermore you can choose the volume of the staff.
Actually, each voice has the same timbre (plays the same sound). But on voices panel you can change this
behaviour:

If the radio button all is selected immediately before closing the staff
configuration menu, all voices produce the same sound (play the same instrument).
Otherwise you can determine the sound of the different voices by selecting one of the
radio buttons 1, 2, 3, or 4. Choose
a sound, a volume, and a stereo position (pan) of each voice.
Note
Different sounds on the same staff produce different sounds on the same MIDI track which causes a very complicated and expansive MIDI output! Thus, if you have the choice between multiple sounds on the same staff or multiple staves you with uniform sound you should choose the latter one!
On channel panel you can assign a midi channel. You should assign a different midi channel to different staves. This is automatically done by NtEd.
Note
Channel 10 is the drum channel on most sound cards and is never assigned automatically
The tempo slider changes the tempo of all staves.
The pan slider determins the stereo position of the instrument. The
chorus slider and the reverb slider determine
the chorus and reverberation effect.
Note
The ALSA sound system does not support the reverberation effect of all soundcards.
The often used modul snd_emu10k1_synth for instance does not support
reverberation. But TiMidity supports it.
On mute panel:

you can mute the whole staff by using the all checkbox. You can also mute
single voices by selecting the voice number.
(see also Muting).
The transp. slider causes a pitch offset during replay. This feature is helpful for instruments which are not in C tuning.
NtEd allowes you to place special letters like flat symbol in staff names:
Flute in A\b -->

The following table gives an overview about the possible signs:
| \O |  |
| \S |  |
| \# |  |
| \b |  |
| \n |  |
| \o |  |
| \c |  |
| \r |  |
| \p |  |
| \. | non breaking space |
| \... | dots |
| \-- | dash |
If there is more than one staff there is a 3rd tab, the staff position tab:

The cursor shows the position of the current staff. Clicking on a different position and OK moves the staff to the new position.
If there is more than one staff a "Delete Staff" button appears:
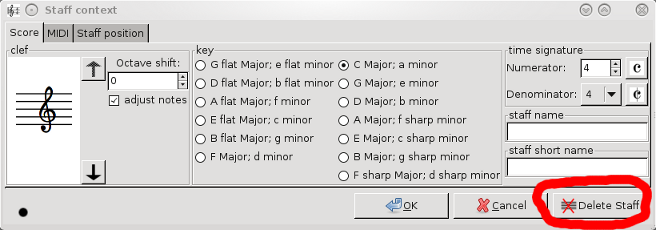
To delete the staff, press this button.
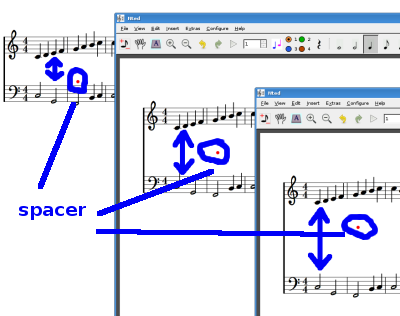
NtEd chooses the staff distance automatically according to the position and height of the elements. This works in most cases. But sometimes the user wishes customized staff distances. To increase the staff distance make sure NtEd is in insert mode (see The 3 modes). Choose:
→
Click at the position to place the spacer on. By clicking and dragging the spacer vertically you can adjust the space between the current staff and the adjacent staves:
To hide the spacer choose:
→
Modifying an deleting spacer works similar to modifying and deleting arbitrary text.
If there is more than one system a "Delete Systems" button appears:

To delete the system, press this button.
Note
You cannot delete the system on first page if the first pages has only one system.